DIY Gold Feather Framed Art

Ever see something that you're absolutely obsessed with and then see the price tag and immediately think that whomever decided on that price was very clearly smoking crack cocaine in its purest form? Glad we're on the same page. 

I had that very thing happen when I first laid eyes on these gold feather shadow boxes from ZGallerie. But when I saw the bigger one listed at $139.95, they got a smooth side eye coupled with a #boybye. 

There was no doubt I could recreate a similar concept for literally less than 5% of the cost. Although I wanted to do a shadow box, Michael's had these cute frames on sale for 70% off, so I picked up two (at $5.99 each) and decided I'd make it work. I had a pack of white feathers at home (who doesn't?) and enough gold paint to repaint every room in my house gold if I wanted. But thanks, ZGallerie for the inspo. 

image.jpg

Note: I might still try this again with a shadow box frame. Currently, Michael's has a 50% off one item coupon available, so I might be making a trip sooner than later. 

What you need: 

  1. White craft feathers (mine are kind of big and I would've used smaller ones if I had them on hand. I like these). 
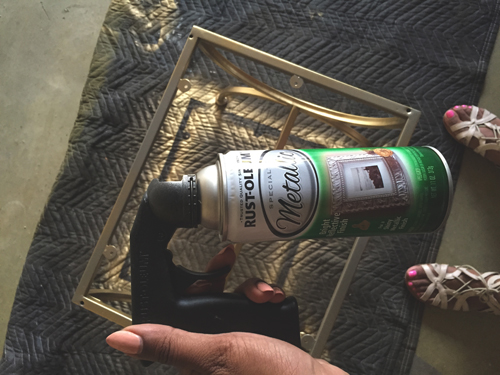
  2. Liquid Gold Leaf (or gold spray paint. Though I prefer the gold leaf effect. Buy some here. Or at your local craft store)
  3. Frame or shadow box (with mat)
image.jpg

Here's how to make it: 

  1. Spray or gold leaf your feather(s)
  2. Allow to dry
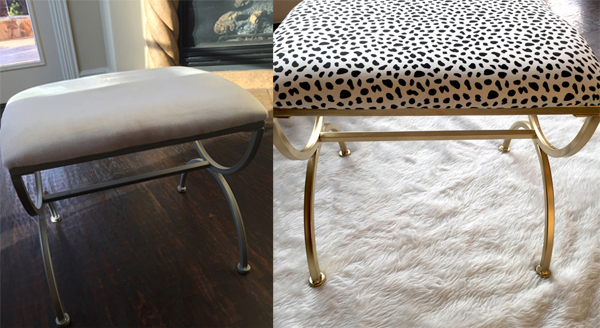
  3. Arrange in frame to your liking 

Voila!

image.jpg
image.jpg
image.jpg

Mildly obsessed. And it's the easiest thing I've done all week. Make you some.  

Cheers!  

Aquia

Not Your Father's...Popsicle

I told y'all I've been a boozy popsicle-making fiend lately. Well, I'm keeping the spirit of summer alive with yet another. And this time, it's creamy. 

I've loved Not Your Father's Rootbeer since the moment the first droplet hit my tongue. I mean, on a regular day, Rootbeer is my jam... add 8% abv and you've got yourself a die hard. Couple a die hard with a popsicle making fanatic...and, well... you get this; Not Your Father's Popsicle.

ere's what you need: 

  1. Not Your Father's Rootbee
  2. 1 tbs. heavy crea
  3. 1/2 tsp. Vanilla extract
  4. 1 tbs mil
  5. popsicle mold (I got mine here)
image.jpg

Mix all the ingredients together, pour in mold, freeze solid, enjoy. If you're looking for a creamy center, you can also pour the beer into the mold and insert stick. Freeze a couple hours (not solid), remove stick and pour mixed creamy ingredients in the center. Boom. 

Happy Summer! ​

image.jpg
image.jpg

DIY Pineapple Vase

Last summer, I developed a mild obsession with doing things with hallowed out fruit (mainly pineapple) shells. Like drinking a cocoloco out of a coconut shell or a piña colada out of a pineapple. You get my drift. But in preparation for summer and less rainy days (fingers crossed, Texas has been unruly), I made this cute little center piece or place setting to tropicalize (I made that up) your summer festivities. 

Here's what you need: 

  1. Pineapple(s)
  2. Flowers of your choice (I wanted peonies, but I missed the boat at Trader Joe's)
  3. Knife
  4. Pineapple corer (optional, but recommended. I bought mine here)

Can I just tell you how magical this pineapple corer tool thingy is? It's magical. In just about 30 seconds, you not only have a hollowed out pineapple shell, but you also have the perfect little pineapple ringlets to snack on. $4, holla! 

pineapple.png

DIY Velvet Choker

This DIY is so simple it seems silly. My intention was to use actual jewelry fasteners for this, but laziness came over me, and simplicity prevailed. Truth is, Hobby Lobby didn't have what I was looking for, so I improvised and it happened to work out.  

This could be repurposed for a variety of different fabric/ribbon, but in this case I chose velvet. Hobby Lobby sells most of their ribbon by the spool, but at like $2/each, I couldn't complain. 

The three things you'll need are ribbon, a hot glue gun, and Velcro "coins" (buy like 15 for $2 here). Oh, and like 3 minutes to spare. And scissors. Don't forget the scissors. 

Instructions: 

  1. Measure ribbon to the width of your neck and cut.  
  2. Apply velcro to each end of cut ribbon with hot glue.  
  3. Put it on and slay.  

Told you it was simple. I made a few others with different type of ribbon that I'll share at some point. Potentially a more sophisticated, store-bought looking version. But in the meantime, this gets the job done. Enjoy!

image.jpg
image.jpg
image.jpg

3 Ingredient Whiskey Cocktail

Cheers to the freakin' weekend! If you know me, you know I love a good cocktail. Typically craft and of the whiskey variety (although I get weak in the knees for a good margarita). When Patrick and I were planning our wedding, I accidentally (not) added a whole lot of bar ware to our registry -- and it just so happened that that's what people bought us. So needless to say, I have had a blast experimenting and playing mixologist (I make a mean old fashioned). However, as you might know by now, I don't do complicated. So if there are more than 4ish ingredients and some of which I have never heard of/can't pronounce, chances are it's not happening. 

So here, friends, is the most simple little cocktail to kick off your Friday night. 

Ingredients 

  1. 2 oz. Whiskey 
  2. Half lemon 
  3. 1 oz. Grade A Maple Syrup
  4. Splash of Club Soda (optional)

In a shaker, add ice, whiskey, lemon and maple syrup. Shake it like a shake weight. Pour in a highball glass over ice. If necessary, add a splash of club soda. Enjoy!

xo, 

Aquia


DIY Faux Fur Purse Chain

I've been searching for a DIY for one of these purse/key chains ever since I saw them come on the scene. Mainly because I've seen the prices range from $14-$50, and let's just say I refuse. Then I saw Alyssa Forever's post about her DIY furry slides and when I realized she used feather boas, I jetted over to my second home...Hobby Lobby. 

This little project took less than an hour to complete...with the trip to Hobby Lobby included and was so easy, my 17 year old niece made a couple for herself and her friend. They're really cute and fun and make great gifts. 

Here's What You Need: 

  • I got the feather boas from Hobby Lobby for $4.99 each. They had a variety of colors. Be sure you get the fine feathers as they do have actual feather boas as well. 
  • 3 inch styrofoam balls. I also picked up 2.5in ones to make a variety of sizes. 
  • Key rings
  • Chain (I had some in my craft closet, but also purchased one in the jewelry section of Hobby Lobby)
  • Sewing pins (I got yellow because I'm cheap and they were the cheapest option. But I would advise getting white or a more neutral color.)
  • Scissors

Here's How:

  1. Cut off the random rope at the end of the boa
  2. Stick a sewing pin at the very end, ensuring you get it in the center so it holds
  3. Stick the pin into the center of the ball 
  4. Begin wrapping the boa in a circle, pinning every half inch or so
  5. Once you cover one half of the ball, cut the extra and repeat the process for the other half (I've found this method to be more sturdy than trying to wrap in a circular motion)
  6. Once the entire ball is covered, take you chain (taking out links if you need to) and attached one end to the key ring
  7. Take the other end and put a pin through the hole (you may have to tighten it with a pair of pliers so it wraps tightly around the pin)
  8. Voila!

Enjoy!

xo, 

Aquia


DIY Bar Cart

I'm all about the bar cart movement. That is, putting my drinking habit on a pretty display. While the bottles may hardly ever stay full, I think it makes for a good decor piece. I'm pretty sure the least expensive bar carts are sold at Target -- but while hundreds of dollars less than those you might find West Elm or Pottery Barn, $130 was still just a little more than I was willing to pay for something I can't consume (jk, I promise I'm not an alcoholic). 

I'm pretty sure I got the inspiration from Pinterest (though the source has been lost in a sea of pins) to use an IKEA utility cart and turn it into what had the potential to be a bar cart. Now, IKEA has several utility carts that could be easily transformed into a nice bar cart -- like this one:

KLASEN Serving Cart - $109

KLASEN Serving Cart - $109

But for the sake of this DIY and my piggy bank, I decided not to spend more than $40. So I went with the BYGEL Utility Cart for $29.99. 

The process for this was simple. Gold spray paint, duh. And because it's IKEA and you obviously have to assemble everything, I painted the metal frame, hooks and wheels before assembling. Then put it together and voila! 

Xo, 

Aquia 

Photos by: Nolita Nouveau

DIY Vanity Stool Makeover

I'm not sure why it took me this long to do this. Well, I suppose because there's so much remodeling I want to do in our bathroom, that having a pretty vanity stool was the least of my concern? Let's just go with that. 

If you know me, you know I have to fight my urge to paint every corner in my house gold, so it's no surprise that this piece would be gold. I've also been mildly obsessed with the Thaibaut Tanzania wallpaper I've seen all over Pinterest, so I was so excited to walk into my local Hobby Lobby and find fabric in an identical print. 

Anyway, this project (like most of the ones I commit myself to) took little time. I was able to cook dinner between the paint drying and finish it in under an hour. 

I purchased my stool over two years ago, and as you can see, it was practically begging me for a refresh. 

                                                                      &nbs…

                                                                                                  Two year old stool from Bed Bath & Beyond. 

All you need is spray paint in the color of your choice (gold, obvi), a heavy-duty staple gun, fabric and scissors. 

I started by disassembling the stool which required all of unscrewing about 6 screws. 

Then I sprayed the base. It's true, Rustoleum has the best gold spray paint I've used...and I've used more gold spray paint than I'd like to admit. 

Once the base was dry, it was time to reupholster the seat. This was probably the most time consuming part because the corners were a problem child. I had to play with them a while before they looked presentable. For the rest, I just pulled tightly and stapled - while paying attention to the holes so I was still able to screw it back onto the legs. 

image6.JPG

Once that was done, I simply screwed the seat back onto the base and voila, magic. 

I'm slightly obsessed now. I've been searching Craigslist like a crazy person trying to find pieces I can reupholster. 

Printables

Every now and again my co-worker and I will spend a few unproductive hours of our days looking at cute prints online. Between Etsy and Pinterest I've found so many that I love. I can't, however, bring myself to pay the usually high asking price for a simple print made with font that I can download online. So, of course I make my own. Photoshop and free font downloads are my friend. 

This is one of my favorites. I love me a good Old Fashioned and knew this could hang marvelously  over my bar cart. But at $72? Yeah, no.

So with Photoshop and 5 minutes to spare, I made my own, printed it and hung it in a frame I'd painted gold a while back and had nothing to put in. 

Anyway, I have a few that I've made (some that I've printed, others that I haven't) that I can share! All you have to do is download and print and frame. Most are 8x10 so if you have a frame smaller than that, you'll have to resize. Which one is your favorite? 


Click to download. 

Click to download. 

Enjoy!

xo, 

Aquia

DIY Marble MacBook Cover

I'm obsessed with marble contact paper. I learned of its existence through my daily blog stalking for DIY projects.  

Something you should know: I don't do super time-consuming, need-more-than-4-materials, build-my-own-house DIYs. Ain't nobody got time for that. So I was really excited to see that this required all of 3 things (including the laptop) and a 10 minute attention span (cause that's all I got). 

image.jpg

Yep, that's it. I didn't document the rest of the steps in images because I had to be super focused and stuff (because knives), but it's so simple that you don't really need pictures to explain. 

DIY Marble Macbook Cover

  1. Dust off your computer (if it's anything like mine) with a soft cloth
  2. Lay your computer top down on the inside of the contact paper (non-marble side)
  3. Leave about half an inch (if that) around the perimeter and begin cutting through the paper with the Xacto knife (the paper even has nice ruler lines that make it easy
  4. Remove contact paper backing and (starting from the front) carefully place the paper at the edge of the computer, slowly pressing it down as you work from front to back (or back to front - whichever tickles your fancy)
  5. Press firmly with your finger or a credit card to smooth out bubbles
  6. Cut off excess paper around the edges
  7. Open your laptop (make sure it's on) so the Apple illuminates and trace it with the Xacto knife (yes, this was the most difficult part and where I almost quit and said 'eff this' - so, good luck with your patience)
  8. Remove the paper from the Apple and voila! 
image.jpg