DIY Boot Bra
/This DIY "boot bra" is super simple... like suuuuper simple to make. And I suppose they're called "bras" because they support your boots (boobs), but unlike actual bras, these aren't cumbersome, annoying or restrictive.
Read MoreThis DIY "boot bra" is super simple... like suuuuper simple to make. And I suppose they're called "bras" because they support your boots (boobs), but unlike actual bras, these aren't cumbersome, annoying or restrictive.
Read MoreHappy Thanksgiving week! I have a super easy DIY for you just in time for the holiday. I decided super last minute to host my parents at our new home and I'm super excited for them to come. It's always a good time when we get together and there are few things I enjoy more than late night hangs with my daddy.
Read MoreHappy Spring! I'm over the moon for this weather we've had in Texas the past couple of days. Blue skies and high 70º temps have their way of putting me in the best of moods. Speaking of good moods, I never knew how much a banana pudding cocktail on a warm Spring day could also contribute to said mood. But let me tell ya.
I've had my eye on the Jackson Morgan brand for quite some time now. I love all things creamy, so when you take a creamy treat and mix it with whiskey? I'm sold. I've been dying to get my hands on the Salted Caramel flavor because salted caramel is hands down my favorite flavor combination of all time. But banana pudding isn't too far behind.
Jackson Morgan Southern Cream can be served chilled straight up or mixed into a cocktail. I wanted to give this a real banana pudding feel so I served it shaken with a float of homemade whipped cream and garnished it with crumbled Nilla Wafers.
When I tell you it was GOODT, I tell you no lies. Yes, good with a t for flavor. I knew I wanted a whipped cream float to sit atop of the shaken liqueur, so I didn't want to get the canned crap and spray it on. I've mastered the art of perfectly whipped cream from all of the Irish coffees I made over the holidays, so I took this route.
Jackson Morgan is an American brand born out of the need for a craft whiskey cream. They have flavors such as peaches and cream, salted caramel, and orange whip to name a few, and they are all on my must try list. Check out their store locator to find a bottle near you.
Check out the recipe below and try this boozy dessert in a cocktail glass.
Shake banana pudding cream in cocktail shaker over ice.
Strain into coupe glass
Using a stick blender (very important for whipped cream), whip the cream on low until you get a loose, but thicker consistency.
Using a spoon, pour whipped cream over spoon, into the glass to separate from the liqueur
Garnish with crumbled Nilla Wafers + banana slice
Enjoy!
Xo,
Aquia
Disclosure: This post was produced in conjunction with Wax Cabin Candle Co. As always, thoughts are my own. Thanks for supporting sponsors that keep content fresh on thefauxfancy.com.
We are 6 days away from Christmas (HOW THE HECK DID THAT HAPPEN?!) and here I am, the biggest procrastinator in America. I literally have purchased nothing. But don't worry, if college taught me anything, is that I work best under pressure -- like 3 minutes left in the 4th quarter and we're down 18 type of pressure.
That said, I'm sharing my go-to last minute (or not) gift for every occasion. You literally can't go wrong with gifting booze -- that is unless the receiver is a recovering alcoholic or doesn't drink for whatever reason. Oh, or pregnant. I forget that's a thing.
Anyhow, here is a tried and true gift idea for all of your non-alcoholic, not pregnant, social drinking friends and colleagues: The Booze Box.
It's as simple as it seems -- figure out your friends drink of choice or just pick a classic cocktail and buy all of the components necessary to make said cocktail. My go-to is a Moscow Mule - because everyone loves their own copper cups and they're so simple to make. I refuse to pay the absurd amount that regular stores charge for copper mugs, so about 90% of the time I score one at either Walmart ($5) or TJ Maxx (~$7).
You simply add a copper mug, a mini bottle (or two) of vodka, a lime and an individual ginger beer. And, if you're fancy, add a cocktail recipe card with instructions on how to craft the perfect cocktail.
Other cocktail suggestions are an old fashioned (my favorite), side car, mint julep. The list goes on. I purchased mini glass tubes for the bitters and added a few sugar cubes to the box to create a perfect old fashioned.
Show up to your office Christmas party or gift exchange and have everyone fight over your gift. Because that's always the goal.
Merry Christmas, kids!
xo,
Aquia
You know what's hard? Marketing yourself. Talking about how how awesome you are and the great things you're doing without sounding braggy is tough. That's why I'm more about that slide-a-business-card-and-lets-discuss-via-email life. No, but really, I used to have non-9-to-5 sponsored business cards when I was in college and trying to land my "dream" PR job, and while I can't say they were responsible for helping land said job, I do understand their importance.
I searched a couple options for designing my "blogger" business cards and was very close to purchasing a design from Moo. But after I got to thinking about it, I realized that I'm not making enough monies from this here blogging to invest in fancy business cards. So I opted to make my own on Canva. Canva makes it easy to produce graphic designs when you're like me and don't want to continue paying for Photoshop. I have the Canva for business version, but you could totally make something great with the free version as well.
Once I designed my cards, I did some price comparing to find the cheapest printer. Staples won by a long shot. I believe I got somewhere around 250 cards for about $14. Y'all know I love me some gold, and I had the option to add a metallic foil to the cards, but I opted out and instead decided to gild the edges myself with liquid gold leaf.
I saw a DIY somewhere on Pinterest that cut out the top of a toy alligator and business cards fit perfectly inside. Can we not talk about how miserably I failed at recreating that? For starters, idk what type of knife, saw, jack hammer you need to cut through a toy alligator, but I tried as hard as I could and stopped shortly before I lost a finger. The alligator I got from Hobby Lobby was apparently real gator because I could not, for the life of me, cut through that thing. Just when I almost counted it a fail, I realized that I had the most obvious business card holder that called for no knives... the alligator's mouth, duh.
What you need:
Spray paint your alligator with the color of your choice. Holding a stack of business cards irmly together, paint the edges with the liquid gold leaf. Let both dry. Place cards in alligators mouth and proudly display on your desk. Voila.
xo,
Aquia
Sometimes I make something that I think is too simple to share. Or to even write about for that matter. This is one of those times, although it's so cute how could I not share?
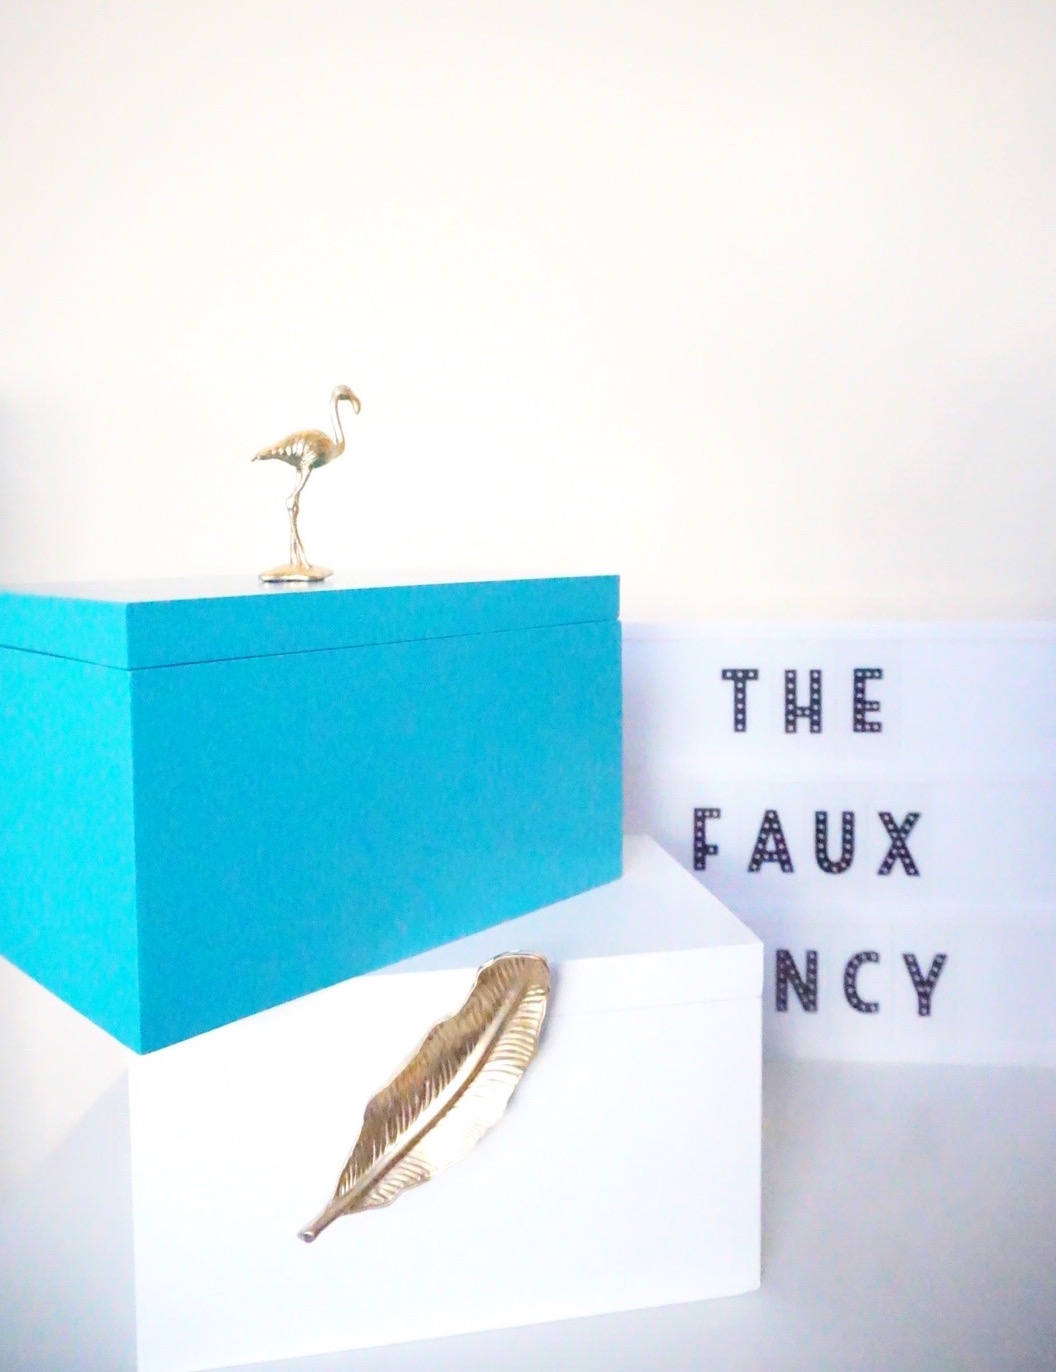
There was a week (about a week ago) that out of 5 week days, I was in Michael's 4 of them... consecutively. I'm usually more of a Hobby Lobby girl, but Michael's gift and clearance section is a force to be reckoned with. I kept seeing these cute little wooden boxes sitting pretty in a variety of colors, and the 70% off sign in front of them, and talked myself into thinking I didn't need them. But myself knew better. So on the 3rd trip, I scanned the boxes at the price checker, saw that they were about $4 a piece and threw them in my cart...like a boss.
I still wasn't sure what I'd do with them, but while passing by the little rubber animal section, I soon had a vision. Little trinket boxes with cute little figurines on the lids. Michael's rubber animal selection was seriously lacking that day. I wanted a giraffe, but not a huge one, and of course they were out of not-huge giraffes. I wanted a snake, but a decent sized one, but of course they only had anacondas. Once I saw the flamingo I was sold. While in route to the register (in that section that they put all the irresistible $1.50 items that you have no use for but have to have and don't have much time to think it all the way through because it's almost your turn to check out), I saw the cutest little feather figurine that I assume could've served as a ring dish and threw it in the cart.
Anyway, the moral of the story is go to Michael's and grab a few of those cute boxes before they're all gone. Or before I beat you to it. And if you don't get lucky, you could very easily do the same thing with boxes from the wood craft section and a little paint.
Enjoy!
xo,
Aquia
It's officially hot as what some might imagine hell to feel like. Luckily for me, I'm stocked up on my summer water (that would be rosé). A girl's gotta stay hydrated. The only thing better than regular rosé is frozen rosé (read: frozé).
I got a popsicle mold set on Amazon recently, and I have been on a popsicle making frenzy. It's pretty ridiculous, actually. I've made Moscow Mule Popsicles, Not Your Father's Rootbeer popsicles (blog post to come) and every boozy combination in between. This one, however, is one of my favs. Obviously because they're pretty and also because they're tasty.
Here's what you need:
Pretty self explanatory, I'd say. But simply cut the dragon fruit, add it to the molds, pour in the rosé and freeze for at least 8 hours. And while you wait, you deserve to enjoy the rest of the dragonfruit with a tall glass of leftover wine. No, but really, I was pleasantly surprised by how well they marry.
Happy summering! Enjoy!
Summer is hands down my favorite season. I might complain once or twice about the outlandish Texas heat, but when it's all said and done, I would prefer to be in the sweltering heat than the cold any. day. Life's just so much more pleasant during the warmer months. Patios, pools, cocktails... I mean, come on. Once all this rain decides to chill the hell out, it will feel moe like summer, but I was thankful for the few hours of sunshine we got on Memorial Day. So to pay tribute, I made myself a watermelon cocktail and frolicked in my pool.
So for fans of summer everywhere, I'd like to share said watermelon cocktail with you. And if you don't like watermelon, then... never mind, I was going to say something rude.
Hope you had a fantabulous Memorial Day! My favorite thing about long weekends is the short week that follows, of course. So today, I'm sharing a super simple DIY to do in all your newfound time.
If you're super analytical, then sure you can tell this is an arts and crafts project, but otherwise... Not so much. This adds a cute (and inexpensive) addition to coffee tables and/or bookshelves everywhere.
Here's what you need:
No really, that's it. I think the rest is super self-explanatory, but you simply spray paint the ball (or dome) gold and add as many toothpicks as it takes. Then, give it another spray, ensuring you cover all sides of the toothpicks. And there you have it. You're no Nate Berkus but you're pretty damn close. So kudos!
Ya'll, I've been slacking. Admittedly. I was trying to stay on my at LEAST once/week schedule, but last week through me for a loop. Because adulthood. And full time job-hood. And ladytime-hood. Anyway, today I'm sharing a super simple DIY that I did a very long time ago but haven't had the opportunity to share yet. I bought all of the supplies months ago with the intention of gifting it to a friend for her birthday. Her birthday was in January. In two days, it'll be April. Judge me.
I really loved this lucite/acrylic side table from CB2. But for $80 + shipping - nahhhh.
CB2 - Acrylic Tray Table - $79.95
This project simply calls for a cheap Ikea laundry basket, a picture frame, and some basic decorative hardware from Home Depot (and some heavy duty glue). No really, dassit.
Here's the rundown.
You'll need:
The step-by-step
This can be used as a side table or even a drink stand of sorts. If you wanted to go a step further, you could also secure hardware handles to the frame to give it another look.
xo,
Aquia
I was inspired to DIY this sleep mask after seeing a very similar one online, thinking to myself 'oh that's cute', only to see it listed for $69. Puh-leeze. No thank you. I don't care how "luxurious" your sleep masks are (the company's words, not mine), how does one appreciate luxury during REM sleep? They don't. That's how. So unless these sleep masks are stitched with hair from Beyonce's lace front wig, my $69 will stay in my pocket.
Let's be clear that I never actually wear sleep masks, but I'm down to try new things in the name of cuteness, and this was a cheap thrill.
All you need is:
I think the steps are pretty obvious, but just in case...
Shop the supplies here:
Xo,
Aquia
Happy New Year (I know, I suck)! I wish I had some really fabulous excuse for why we are 19 days in and I haven't posted -- like I've been jet setting across the globe, backpacking in South America, or chillin' in the Caribbean -- but I've got nothing...except a promise to do better. Let's just talk about this dedication really quick though... Because I already blogged this once, but then my computer froze right before I was about to publish & save and everything fell into the Internet's black hole. FML. I bet I'll be "saving" every 2 minutes from here on out.
I'm really excited about this project. It was somewhat easy, and really pretty. I say somewhat because it could have been a lot simpler...but ever since purchasing my own (as in mine not to be shared with my husband) drill, I've been trying to drill the shit out of everything... messing up a few walls along the way. That said, keep in mind that a drill for this project is optional -- unless you're like me and eager to drill and don't have the patience for drying glue.
I typically hate rose gold (sue me) and coppery things, but how cute are these copper "feet?" I thought it added a nice contrast. This tray can be used for anything really. A perfume tray, general decor, serving tray, etc. For now, mine is just sitting on a bookshelf in my master bedroom, but will likely move it to my office once that is slightly more organized.
5. Once the board is wrapped, decide (if you haven't already) if you're going to go the glue or drill route. If you plan to drill, be sure to measure the spacing between the handles so they're even and equal distance from the edges. Then you'll need to use your best judgement and pencil mark where your holes will go (this was the hard part for me. I messed up a couple times and had to re-drill and pretty much force the screw in). Once the holes are drilled, secure the handles using the provided screws.
6. If you plan to glue, simply measure how you want to layout the handles and glue them in place. Be sure they are completely dry before moving on the the next step.
7. Once the handles are secure, flip over the tray and glue a copper plug at each corner. Allow to dry. And voila!
I'm still kind of impressed by this. It turned out really nice and I'm already thinking about making a bigger one.
Definitely share any pictures if you decide to make one! Enjoy.
xo,
Aquia
Welcome to the ultimate guide to life with Aquia – featuring everything from home decor, DIY, style, beauty, everyday life, and more. I teach you how to lead a life of luxury without breaking the bank.